Turn on suggestions
Auto-suggest helps you quickly narrow down your search results by suggesting possible matches as you type.
Showing results for
Hi There , we have 2 locations and want to use 2 different inv templates even differnt name and logo but when i create 2nd template ,it changes on both .any solutions its one business but store name and logo is diffenrt we are not trying to add 2nd business only need 2nd inv template xero offer that but its big job for me to swtich before trying here support confirms that this is not possible in qbo
Thank you for reaching out with your query regarding customizing invoice templates in QuickBooks Online (QBO), record gst refun.
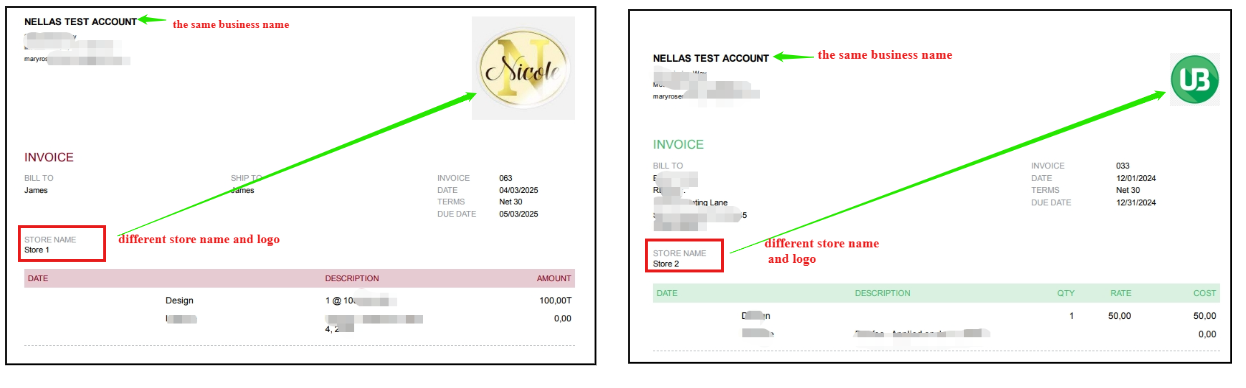
It is true that if you change the business name in one invoice template, it will update across all templates because QuickBooks uses the same company name for all forms to maintain consistency within the account.
However, there is some flexibility with logos in QBO. You can use a different logo for each invoice template. This allows you to have multiple templates with different logos, even though the business name remains the same.
As a workaround for adding unique store names or other identifiers to your invoices, you can create a custom field within the invoice template. It can be labeled something like “Store Name,” and you can manually enter the appropriate name on each invoice. This way, your invoices can reflect the specific store or operation while maintaining the same overall business name in the settings.
This may not fully meet your expectations in terms of having distinct business names tied to specific templates, but this workaround helps bridge the gap.
Here’s how you can achieve this:
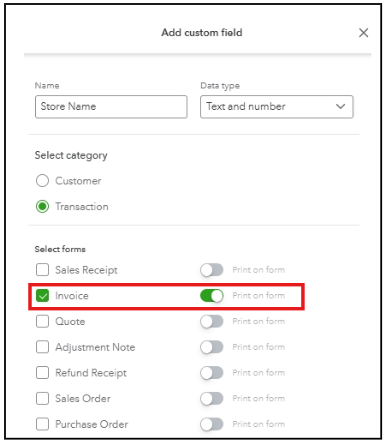
Once done, you can input the store name or other identifiers for each invoice, and it will appear on your form.
For the logo, ensure the specific template for each invoice has the corresponding logo uploaded. Then, select that template to apply the correct logo.
To make this even easier for you, I've included screenshots below for reference.
If you need further assistance or have additional questions setting up these customizations, make sure to leave a reply below. We'd be happy to provide further help.
You have clicked a link to a site outside of the QuickBooks or ProFile Communities. By clicking "Continue", you will leave the community and be taken to that site instead.
For more information visit our Security Center or to report suspicious websites you can contact us here